
We often disregard the importance of working on a properly calibrated monitor, especially when viewing and editing tethered images in real time. The stakes are even higher when the client is there with you, and during the print process, you come to find out that what you were viewing was not what was delivered to the client, whether for print or digital assets. I’ve been guilty of this myself.
The foundation of your image processing relies heavily on accuracy, consistency, and predictability. This is why I calibrate my displays both in studio and on location, and with the Studio Match option in the Spyder X2 Ultra, I can tailor my desktop and laptop display to the closest possible visual match both in brightness and color temperature. Contrary to popular belief, the process is very intuitive and non-intimidating. This process is very important to me since I am often using color filters on my lights for correction and special effects, and making calculated color adjustments on a properly calibrated display creates much less work in post processing.

Now let’s talk about creating low-key style portraits. In a low-key portrait, the face is the brightest lit portion in the image, contrary to hi-key, in which the face carries the darker values in the portrait. In simple terms, the face always stands out in the portrait through lighting contrast and value, whether low- or high-key. As such, identifying your black and white points while post-processing your images, should always be done on a correctly calibrated monitor.
Here’s a real-life scenario: Recently, I was making adjustments on one of my older computers and pulled print proofs for an ad. The images printed dark with detail lost in the blacks. After reviewing my files, I determined the problem was my uncalibrated monitor. My workstation sits by a bay window with lots of natural light, coupled with my monitor being set to auto display adjustment, which created a recipe for disaster. The monitor set an inaccurate auto adjustment much brighter than required, so I brought down the tonal value range in my images, which in turn, reproduced dark muddy images, losing details in the blacks. In my opinion, this is one of the most common mistakes photographers can make while trying to reproduce accurate low-key images. The same can occur when working on hi-key images, where you can either have your whites looking dull, or, on the opposite side of the spectrum, clip your highlights.
The Low-Key Project
Recently, I’ve been working on creating a set of music label images for singer/song writer, Talia. This spanned over a set of shoots, since some images needed a dark low-key mood that required being shot at dawn, and others would be silhouetted and shot at sunset. Both shoots were shot tethered to make real-time adjustments and creative choices with our lighting and technical aspects of the shoot.
The first shoot was set for Easter Sunday at sunset. I live in Santa Monica. California where it is always sunny, but on this day, we had a rare, atmospheric low pressure with dense fog. It was very eerie and surreal, unlike the bright sunny backlit portraits we had planned for in our storyboards. We did not mind, as the music was titled “Moon Kiss,” so the dark lighting conditions were fitting for the theme, so we decided to create the low-key images at this time. The objective was to create a series of dance images shot as if Talia were dancing with the moon, with soft movement in the posing. We also planned on creating tight beauty shots that would show deep thoughtful expressions and less beauty/glamour, though her face is intrinsically glamorous. We drove down Pacific Coast Highway, scouting the perfect spot for our shoot. We found a great rock-formed jetty set up high over the sand and water. This was perfect since it allowed Talia to use the path as a runway and I was also able to set up my laptop and camera gear without getting any of it wet. Here are the specifics to our shoot:
Lighting & Tech Notes
I had to choose a streamlined setup with minimal gear based on the lighting conditions and lack of assistants to help. Since the sun was no longer a factor to compete with, I decided to carry a set of Nissin compact flashes with Rogue modifiers. One was the MG10, which is powerful, having the equivalent of 160ws power, and the second was the compact MG80 Pro, also with plenty of power for the task, though our power usage was minimal considering our dim lighting conditions. When creating low-key images, special attention needs to be given to the amount of light on the subject. Too little can easily create flat looking portraits, while too much can make it look quite artificial, almost like a camera on-flash look. Here are the details of our session:

- Scan the Scene – I began by determining the direction of the existing natural light. Even though it was dark and overcast, there still was a sense of brightness coming from the northwest. I used this as a general guide for placement of my artificial lights, as well as where I set up my makeshift studio. Since the lighting conditions were dim, I had to consider the best angles from the perspective of my tripod. I also considered the placement of my lights and reflectors. I mimicked the quality of light with specific modifiers. Generally, I like to match the contrast ratio in the scene to the contrast ratio on my subject’s face. Another thing to consider at this time was where to set up my display, which should, ideally, be out of direct sunlight. No issues on this occasion.
- Setting up my Workspace – Working on location is quite different than working in a studio. One of the main issues is dealing with glare on your laptop. Usually, you have to set up some type of hood to shade your display and view your screen accurately. In this case, we were fortunate it was completely overcast. Once I determined the first setup, I connected my tethering cable and camera to my laptop and placed it all on top of an apple box. This made it easy to reset to a different location when needed. If I am using a tripod, which I did for the slow shutter speed, high-key beauty shots, I like to create a streamlined environment, which allows me to move around freely. During this process I determine the camera angle I will be shooting from and set up my camera on a tripod with my lens of choice. I usually set up a mat with the lenses, remotes, and accessories I would be using.
- Calibrating on Location with Spyder X2 Ultra – As a photographer, the worst uncertainty is wondering if what you are seeing on screen will be accurately reproduced, for either media (print) or digital assets, especially when there are other decision makers who will be making adjustments along the way.This reminds me of the time I was buying a big screen television at Best Buy. I walk in and see a vast selection of screens, all with different color gamut, contrast, and overall brightness. Our monitors are similar, as many manufacturers and brands display a certain color bias, with warmer or cooler tones. By not calibrating your monitor, you run the chance of not seeing things as they truly should be. The calibration process is very important, and for the short 2-minute investment, it will save you painstaking time in post-processing.The new Spyder X2 Ultra, with its lens-based sensor will scan the full gamut of colors in your monitor and create a color profile for your set working environment. It intuitively identifies technological aspects of your system and prompts you step-by-step through the calibration process. I know some find the thought of calibrating intimidating, but I followed the simple set-up process for an older laptop we had for this session, and it was able to identify the adjustments I needed to make in the brightness of my display. The advanced software keeps the guesswork out of the equation in my shoots, and its user-friendly approach demystifies the whole process. Even from the onset, the introductory menu alerts you to warmup your computer and to reset contrast and monitor settings.
As mentioned earlier, for years I had been working with my preferences set to auto-correct my display, even after I had calibrated, until I read the alert on deactivating this option and made that correction. For this shoot I created a new profile, as I was working under completely different conditions than those in my home studio, with its combination of both natural and ambient light. I had never photographed in fog as dark and thick as was present on this day. Calibration is very important when working with both low-key and high-key portrait photography, and for fine-tuning your black and white photography. After a quick, 2-minute calibration, you have a reference opportunity to view your before and after calibrated display – you might be surprised at the outcome! As in most tethered sessions, we were making lighting adjustments throughout the shoot, paying very close attention to our shadows, and making certain we were retaining detail. In an uncalibrated monitor you can easily have a false representation of your black and white values and underexpose your blacks or overexpose your whites. It was very important for us to keep the overall emotional presence of the scene without over lighting the subject.
- Meter the Ambient Exposure – Many photographers have given up, or don’t even own a light meter, but even with my many years as a photographer, I still use the meter I bought when I first started photography. It always gives me the best possible starting point for my portrait sessions before taking a single shot. We had a few challenges to deal with and our meter kept us accurate. The lighting conditions were dim, and our subject would be moving for a portion of our session, so shutter speed selection was important, as well as aperture for our close-up beauty shots. For our beauty shots I metered the top, sides, and bottom of the face to keep even light from the combination of our flash and ambient mix. The meter allowed me to equate the best possible exposure triangle options as you will see in our final exposure detail. We also would be viewing our images on the laptop, to secure our shadow detail on the low-key images.
- Lights & Modifiers – I kept the lighting quite simple and in the case of our low key-images, I varied the key light from a Rogue Dome modifier, which wrapped the light around Talia’s face, to a Rogue Flash Bender for the high contrast shots, which allowed me to focus the light more prominently on her face. The key light was the Nissin M10 at various power outputs, controlled from the Air 10 commander set on our camera. I varied from ¼ power to ½, but never at full power. As a fill option I did two things; I either dragged the shutter speed to use the low ambient fill, or by using the Nissin MG80 with a white satin umbrella directly behind my camera axis, made sure our shadows were not pure black. We were able to view from our monitor and make those adjustments accordingly.
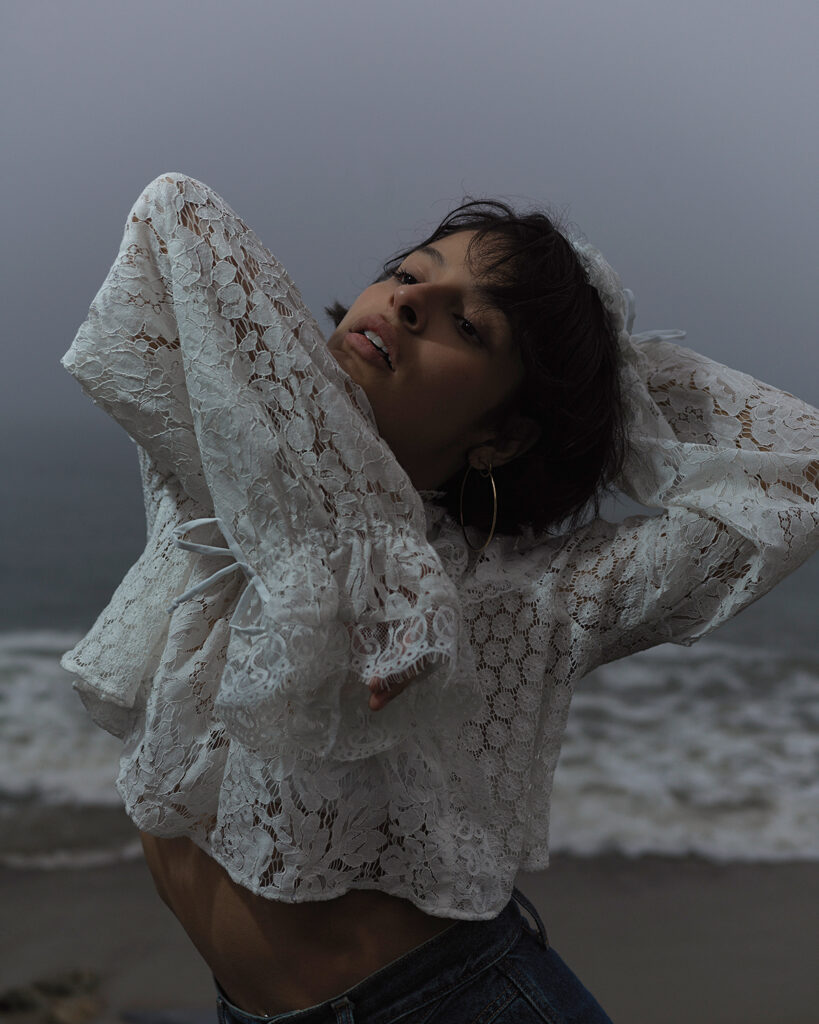
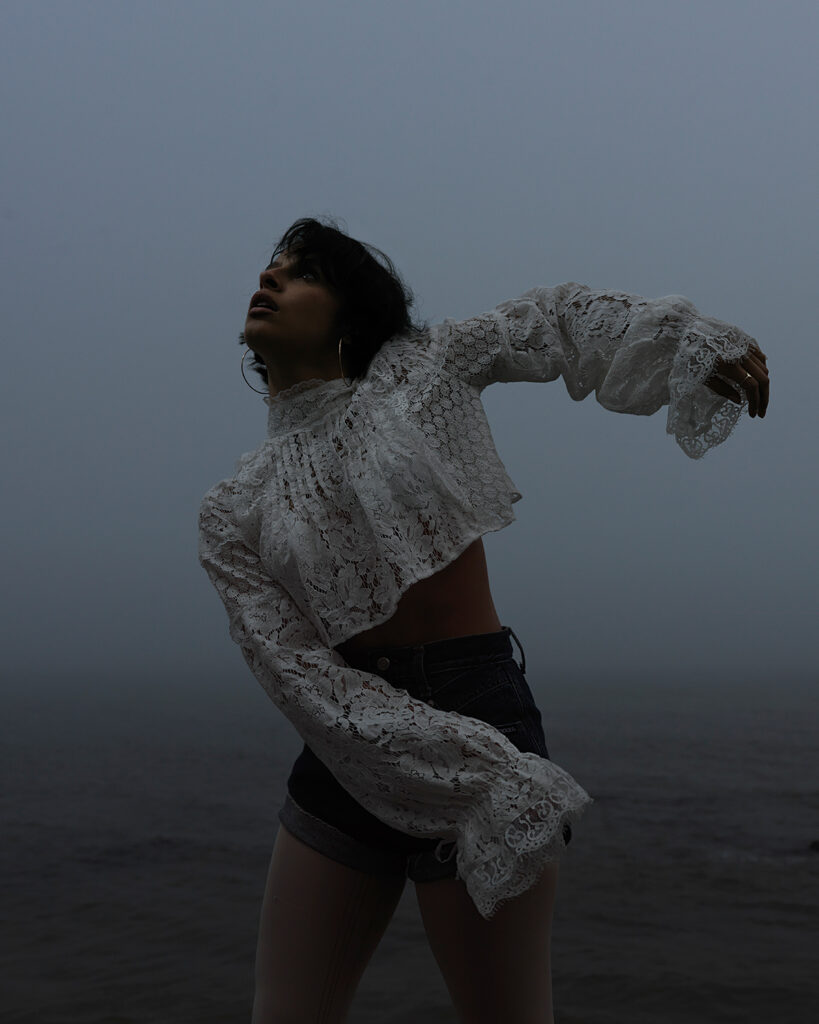
- First Setup – The first setup of the day was the “Moon Kiss” dance shot. The objective was to capture Talia becoming “one” with the environment and ocean, almost as if she were floating out of the water.

We were able to set up the best possible perspective from the jetty set high off the ocean. By using a variable zoom lens, I was able to compress the distance from our vantage point to the distance from the shore, which was about 30 feet away. This also created the illusion of Talia floating off the sea in dance. The first thing I determined was the ambient light exposure. When I shoot mixed light portraits (flash with ambient) I initially determine the role of the ambient – whether it will be my key light source or fill. I started by bracketing my exposure to get an overall feel of the scene. For a more cinematic or moody feel, I increased my shutter speed, and underexposed my background by two stops. In this first setup, a selected speed of 1/750th of second, maintained the dark dramatic scene and accommodated for the slow movement of the dance, all while securing sharp images.
The next step was to light my subject. It is very important to consider the type of modifier you choose to use. For example, using a beauty dish in this case would have made the entire scene look lit, and thus, artificial. For this reason, I chose to use the Rogue Flash Diffuser Dome on the Nissin MG10. Not fancy, nor complicated but quite effective. The characteristics of this modifier allowed the light to wrap around in the Dome, and by placing it at the ideal power, height, and angle, I was able to emulate a faint top light, as if the moon or sun was peeking through the skies.
I used the compact Nissin Carbon Fiber Light Stand with the Ball Head swivel, placed it ten feet high and camera left behind Talia, which allowed me to accurately fine tune a low angle directional to her face. A couple of adjustments were made after viewing our display, mostly powering down our key light directly from our Air 10 remote and maintaining a natural balance between the ambient light and our flash. I also recorded a neutral white balance by taking a shot of the Spyder Checkr and using the eyedropper tool in Lightroom® to further keep accurate and consistent skin tones throughout our session. After varying our exposure, we decide on the exposure below.
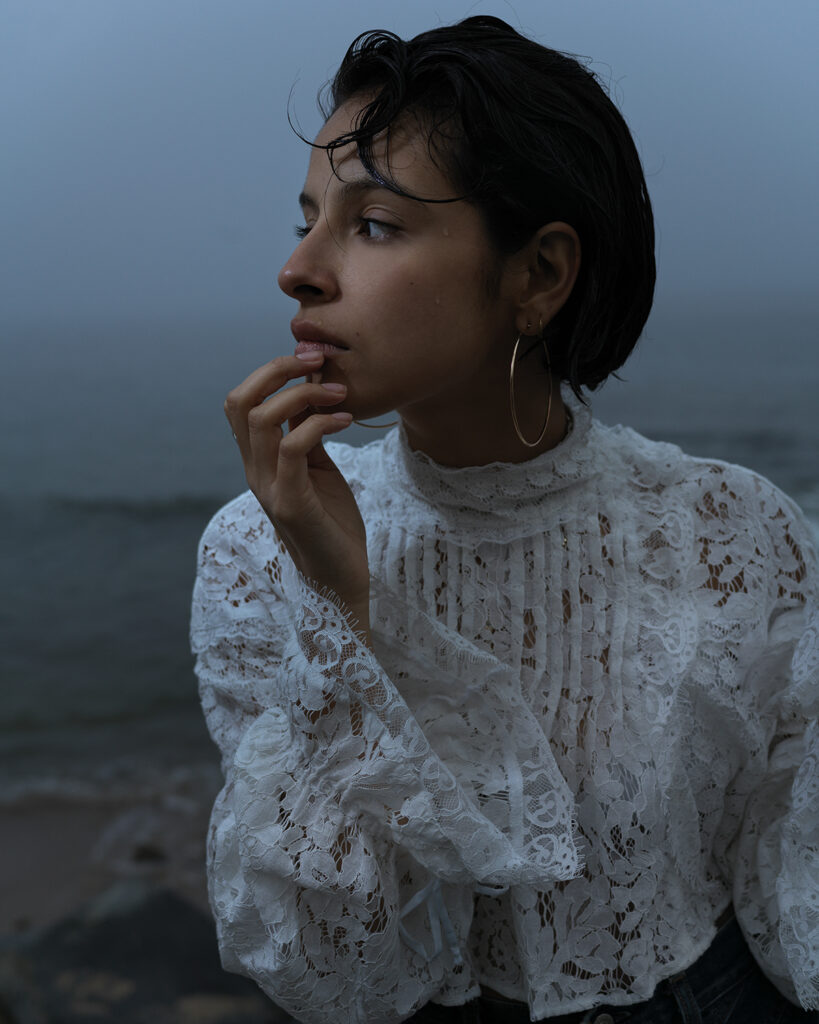
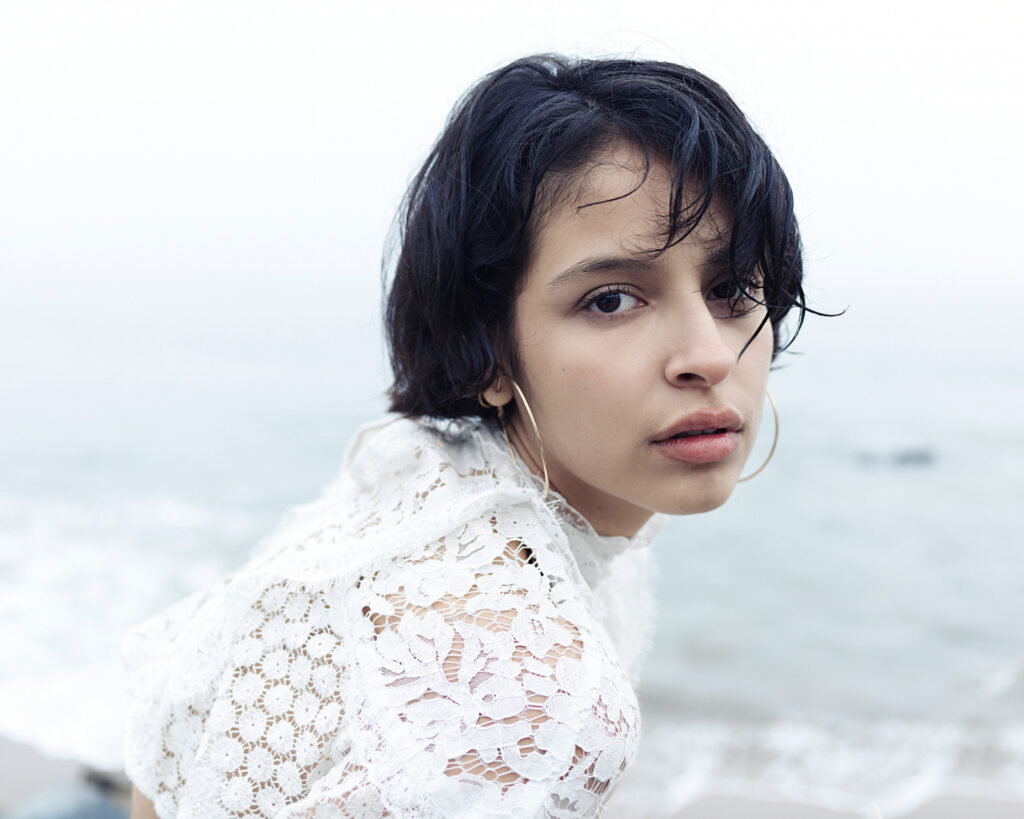
- Second Setup – For the second setup we decided to increase the drama of the shot, focusing the light further and giving us a cinematic look. For this sequence of images, I had Talia comfortably sit on the rocks and we varied the poses from profile to straight camera angle. We decided to shoot ¾ for this series, so she played with different hand poses for added interest.
I also shifted my camera angle a bit lower to capture more of the paler grey skies for added contrast. For my key light, I changed from the Dome to the Rogue Flash Bender 3XL with the strip grid. This modifier has amazing shape ability, which allowed me to focus just the right amount of light on her face. I also brought down the light and positioned it a couple of feet above her. Though the light was closer, because of the diffusion material and added grid, the amount of power was kept the same. I stopped down the ambient exposure from 1/500th to 1/1000th of a second opened the aperture from a F/6.8 to F/4, giving us more front fill on her face.
Note: When combining flash and ambient light, you are essentially sandwiching two exposures. One is ambient, which is controlled by your shutter speed, and the other is the flash, which is controlled by the aperture. The aperture regulates the units of light allowed onto your sensor that are expelled from your flash(es) coupled with the ambient light. For a variation to this setup, I also added a white satin umbrella near my camera axis set as a weak fill at F/4. (See Below)
-
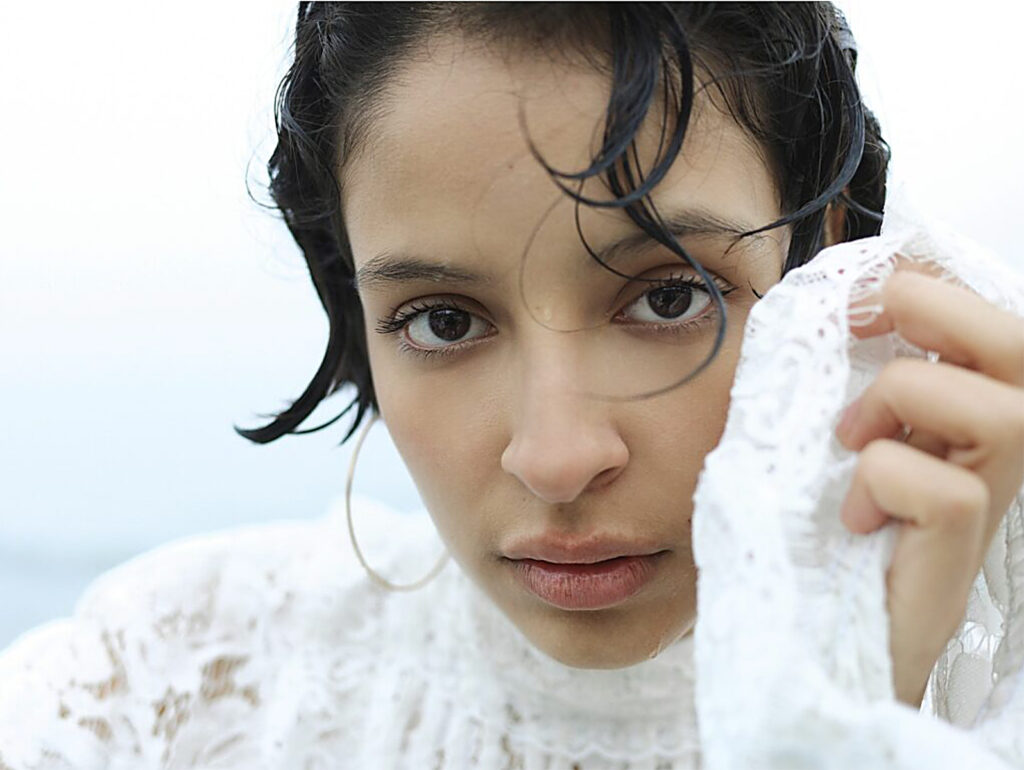
- Third Setup (Beauty Shots) – It’s interesting how we completely changed the look in our third setup. Since these were close-up beauty shots, we decided to brighten the entire scene, going from low-key cinematic portraits to a bright hi-key portrait. Nothing in the scene changed except for how we regulated our lights and ambient exposure. It was as if someone turned on the lights. In creating low-key images in which shadow detail can easily get lost, the opposite can happen when creating hi-key images. Exposing for the highlights is important for retaining detail, thus the need for using a light meter. Equally important is making those adjustments on a properly calibrated monitor. The Spyder X2 Ultra software will run a quick analysis of your black and white points and make those adjustments, so you can be confident that what you see is at true value. We could then make the proper adjustments both to our lights and to our exposure values in our capture software. For this series of beauty shots, we were also pushing our exposure threshold to highlight Talia’s eyes and features. Remember, a hi-key portrait focuses on making the face the most prominent feature in the portrait through exposure value.
Final Exposure: 1/200th of a second f/3.5 ISO 400
Final Exposure: 1/250th of a second f/4 ISO 400
The second camera is over 20 years old, but still my favorite. It’s a Hasselblad HD3 with a 50-110mm lens. It’s still hard to replicate the naturalistic style of images this camera reproduces, even with modern day technology. Even the older CCD sensor carries a vintage film appeal. The drawback is that it is a super-heavy camera and lens combination, so a tripod was needed for the slow speed exposure. Once we found a comfortable seated position for Talia on a rock, we ran a few bracketed test shots and viewed them on our laptop. The faster shutter speeds gave us a more dramatic look, but we wanted brightly lit “airy” portraits, so we dragged our shutter speed for the perfect balance of ambient and flash. We were lucky to capture a bead of water running down her hair just as I clicked the shutter release.
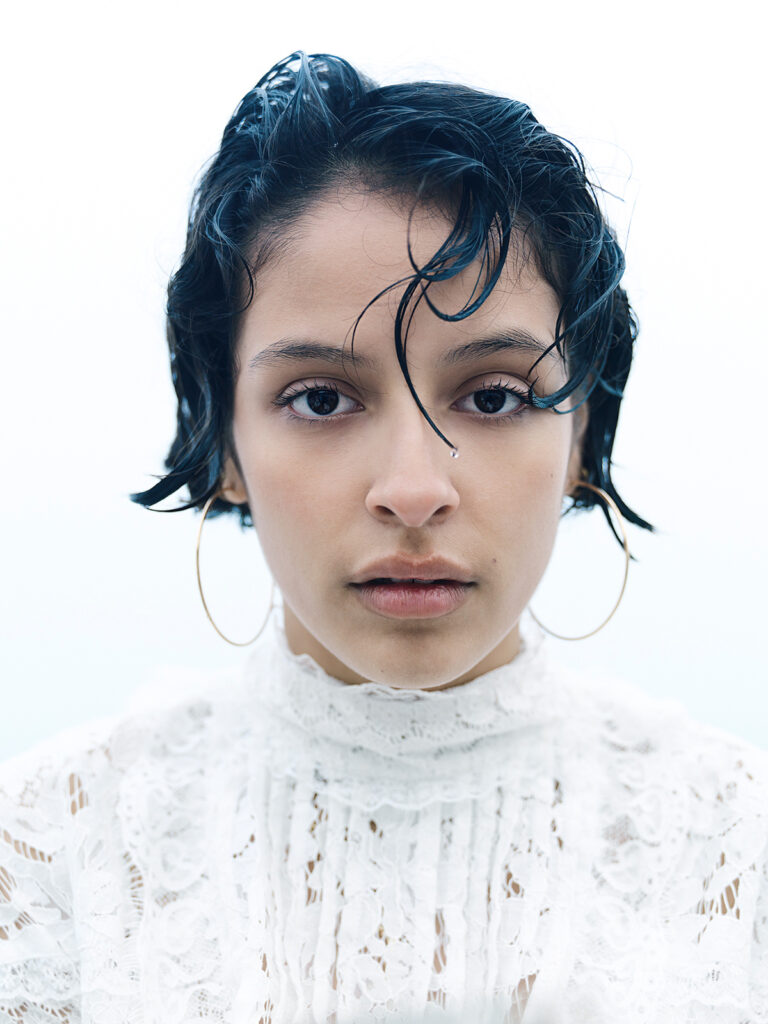
For the key light on these setups, I used the compact Nissin MG80 set at ½ power, and I shot it through a Rogue Satin umbrella placed 5’ high and pointed directly to her face.
After reviewing our entire session there on location, we were very confident we acquired the shots we needed. Calibrating on location with the advanced technology of the new Spyder X2 Ultra gave me the peace of mind I needed. Most of the celebrity work I do can be very stressful when working with agents, managers, and art directors, so the calibration process with the X2 Ultra gives me peace of mind I’ll have accurate and consistent color from capture through print process. The added advantage I get from the new advanced software is that I can also match my laptop to my workstation in my studio. I know that what we shot on location will be exactly what I work with in my studio.
What started as a soupy, foggy Easter Sunday, resulted in a series of amazing portraits for the launch of Talia’s first music release. Some people say, “When life gives you lemons – make lemonade”, but I say, “When life gives you lemon, just enjoy the lemons!”